ElCon chargers come with or without CAN bus.
The charger is controlled through its 7-pin circular connector.
The connector is made by in2connect in the UK
The pin out of that connector is:
| Pin
| Name
| Function
| Notes
|
| 1
| ENAB\
| Connected to pin 3 = enable charging; Open = disable charging
| Must be programmed with Alg 500~599
1 mA load
|
| 2
| GND
| Common
|
|
| 3
| V+
| +11 V when plugged in
| 50 mA max load; do not short circuit!
|
| 4
| RED
| Red LED anode
| Cathode to common
|
| 5
| GRN
| Green LED anode
| Cathode to common
|
| 6
| RX
| Serial in
| For factory set-up
|
| 7
| TX
| Serial out
|

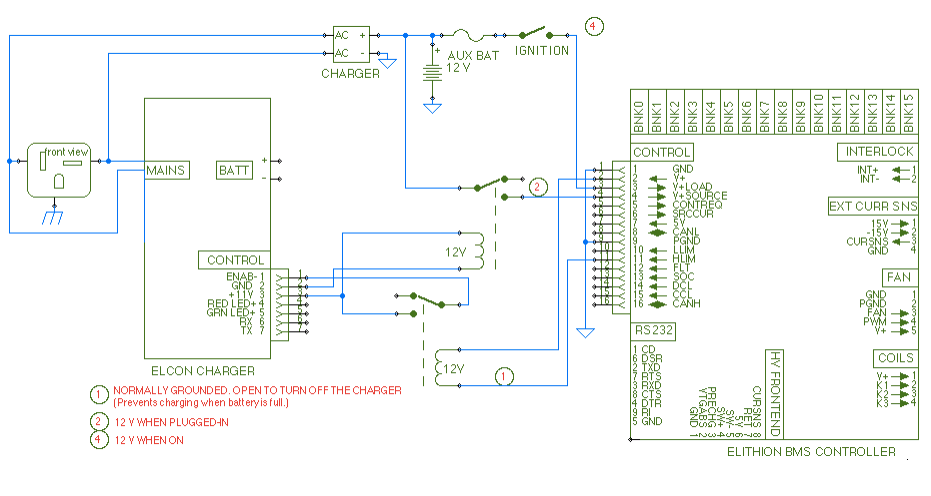
Interfacing an ElCon PFC charger without CAN and the Elithion BMS
NOTES:
- For this to work, the ElCon charger hardware must be a current revision (its control connector must be made of black plastic with blue cover, and not a chrome DIN connector),
and the charger must be programmed by ElCon with Algorithm 500-599 series (as indicated by a small, long white programming label near the serial number label marked such as "Alg 512 288V2K5W ...").
- The ElCon charger is smart, and is great for packs used without a BMS that are already top balanced.
However, its smarts get in the way of the BMS getting the job done.
Unfortunately, ElCon does not offer a plain CCCV charger, which would be ideal.
We have analyzed the ElCon profiles, and the least problematic is profile 520.
Specify the following:
- Profile: 520
- Max voltage, V4: max cell voltage x number of cells in series
- e.g.: for 100 LiFePO4 cells in series: v4 = 100 * 3.6 = 360 V
- All others voltages: don't care
- All currents: max available for that charger
- The mating connector that ElCon ships with their chargers may have just 2 pins in it, at locations 1 and 3, instead of all 7 pins.
If that is the case, you will not be able to connect to pin 2, as shown in the schematic above.
In that case, you either must buy the right mating connector (with all 7 pins), or use a different way to detect the presence of AC power,
as suggested in the chargers section.

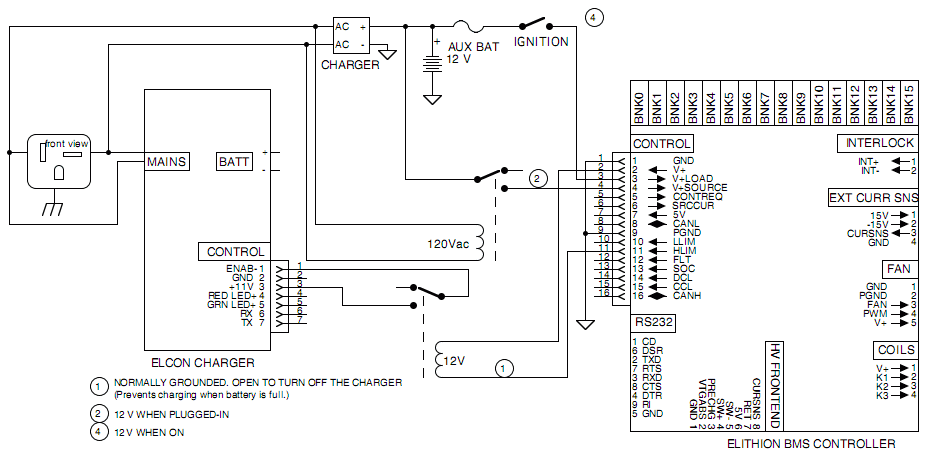
Interfacing an Elcon PFC charger without CAN and without using pin 2
ElCon's original CAN implementation leaves a lot to be desired, and will cause you a lot of hassles.
Therefore, if you get an ElCon charger with the CAN option,
WE STRONGLY RECOMMEND THAT YOU GET AN ELCON CHARGER BUILT AFTER JULY 2011,
whose CAN module is marked "CAN201107".
Yes, if you do have an older ElCon charger with the CAN option, we will try to help you. But, really, there is only so much we can do for you.

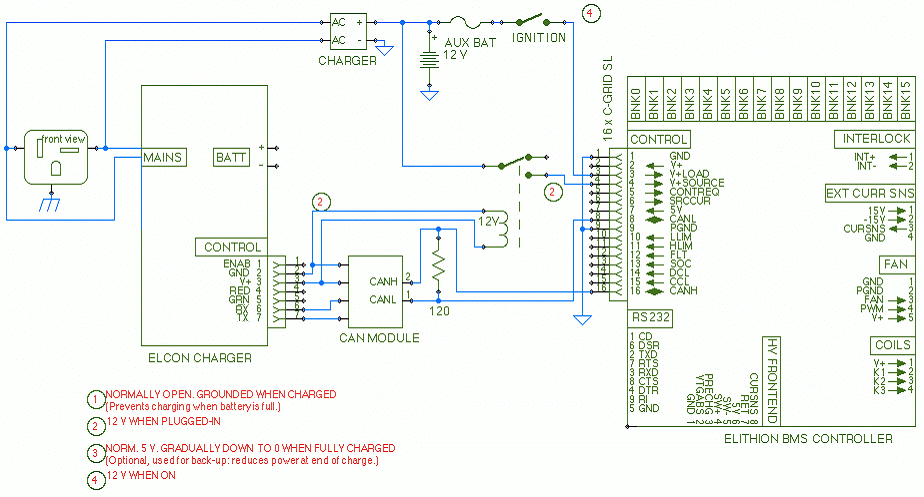
Interfacing an ElCon PFC charger with CAN and the Elithion BMS
Note that, for this to work:
- The ElCon charger must come with the optional CAN bus module
- The Lithiumate controller must have software revision 1.07 and up
- The CAN module does not include a CAN termination: an external termination resistor is required
- The CAN module occupies the 7-pin control connector, yet that connector is required to detect AC presence; therefore, you need to open the 7-pin connector and bring out wires
- CAN module built before July 2011 cannot handle being on buses that contain more than 2 messages per second!
- Too many messages on the CAN bus slow down the ElCon charger, reducing the rate of its output messages, and may crash the charger, which will seize the CAN bus
- The ElCon charger CAN rate is 250 kHz by default and not user programmable (though it can be special ordered at other speeds)
The charger is factory preconfigured to operate with the BMS.
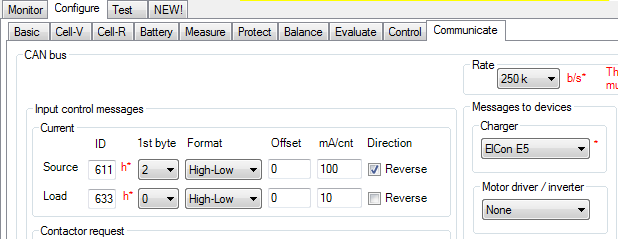
Configure the BMS to operate with the charger.
- Turn on sending messages to this charger and receiving the charger current from it:
- Rev 1.32 and older:
- Turn off messages to other chargers: Home / Set-up / More / CAN bus / Communication with other devices / (other chargers) / No
- Turn on messages to this charger: Home / Set-up / More / CAN bus / Communication with other devices / ElCon charger / Yes
- Rev 1.33 and newer:
- Select messages to this charger: Home / Set-up / More / CAN bus / Communication with other devices / Chargers / ElCon
- Change the CAN speed to 250 kHz
- Home / Set-up / Set-up / More / CAN bus / Can Bus rate / 1
- Reset the BMS controller for changes to the CAN message ID to take effect (Cycle power off and on, or press H / 6/ 7)
GUI:


