A terminal can be connected to the RS232 port on the BMS controller to program and monitor it.
While pretty much any terminal will work, typically a computer running a terminal emulation program is used.
- PC computers
- For PC computers with a serial port, use a DE9 extension cord (male DE9 to the controller, female DE9 to the computer) and connect it to any COM
- For PC computers without a serial port, use a RS232-USB dongle
- Apple MAC computers
- For Mac computers with a printer/modem port, use a male DE9 to printer/modem port cable with a null-modem and connect it to the Modem port or the Printer port.
- For Mac computers without a printer/modem port, use a RS232-USB dongle
To communicate with the BMS controller, a serial port is needed (a male DE-9* connector: 9 male pins surrounded by a trapezoidal metal shroud)
Few laptop computers have serial ports any more.
If your computer doesn't have a serial port, you'll need a USB-Serial adapter (dongle).
* Yes, DE-9 (not DB-9): DA-15, DB-25, DC-37, DD-50, DE-9

USB-RS232 dongle
- Windows:
- Connect the dongle to a USB port
- When asked, insert the CD that came with the dongle into the CD drive
- When done, take out the CD
- Open a terminal emulation application (see below)
- MAC OS-X:
- Insert the CD that came with the dongle into the CD drive
- Navigate to the installer package (e.g.: Driver/(USB-SERIEL2302)/mac/md_pl2303hx_v108b3/PL2303_1.0.8b4.pkg)
- Open the installer package and follow the instructions (select your hard drive when asked)
- When done, eject the CD
- Open a terminal emulation application (see below)
- 19200 baud (rev 1.xx) or 57600 baud (rev 2.xx)
- 8 data bits
- no parity
- 1 stop bit
- Flow control: none
The BMS controller is a DTE (Data Terminal Equipment) and has a female DE-9 connector, compatible with RS232-USB adapters (dongles).
- Pin 2 = TXD: from the BMS Master (DTE) to the computer (DCE)
- Pin 3 = RXD: from the computer (DCE) to the BMS Master (DTE)
- Pin 5 = GND
Pin 9 is connected to the internal 5 V supply, to power certain hand-held terminals.
However, that line is also the RI line from the DCE. Should an RS232 adapter generate a ring signal, it would result in damage to the BMS controller.
No other pins are used.
To communicate with the serial port, you will need a terminal emulation application.
Unlike previous versions of Windows, Vista doesn't have HyperTerminal.
Many options are available; most are quite poor (HyperTerminal), or way too complicated and unfriendly (Indigo Terminal). Few are free.
Our recommendation is a very simple yet powerful, free application that has been the workhorse of computer geeks for a long time: PuTTY.
Here are the instructions to set-up PuTTY to talk to the BMS controller.
- Download PuTTY.exe from PuTTY download page
- No installation is needed
- Open PuTTY; a window will open
- In "Connection type:" click "Serial" (right-most radio button)
- In "Serial line" enter the COM port used (such as "COM7")
- In "Speed" enter "19200" (BMS Rev 1.xx) or "57600" (BMS Rev 2.xx)
- Click "Open" or press the Enter key on your keyboard; a new window will open, replacing the old one
- To get to the Home menu, press the ESC key on your keyboard, or cycle the power on the BMS controller Off and on
- For Windows computers up to XP, use HyperTerminal (Start / Accessories / Communications / HyperTerminal)
- HyperTerminal will ask you for a modem type (ignore it), and may require you to press control-C before it will operate.
- Download ZTerm (free)
- Open the "ZTerm 1.1...OSX.dmg" file to extract it; a new disk image window opens
- Drag the contents of the disk image into the "Utilities" folder in the "Applications" folder
- Open the "Zterm" application; a window opens
- Unselect "Edit/Save Lines Off Top..."
- Select "Settings/Connection..."; a dialog opens
- Set the "Data rate" to "19200" (BMS Rev 1.xx) or "57600" (BMS Rev 2.xx); click "OK"
- Select "Settings/Modem Preferences..."; a dialog opens
- Select the "Serial Port" to the port with the USB-Serial dongle (e.g.:"usbserial0"); click "OK"
- To get to the Home menu, press the ESC key on your keyboard, or cycle the power on the BMS controller Off and on
We don't know what that means, but that's all we could get out of two different Linux users.
If you can add any explanation on how to use them, please let us know.
Note: 19200 for BMS Rev 1.xx, or 57600 for BMS Rev 2.xx
Kermit and minicom
Sample .kermrc file
rothen@ublt:~$ cat .kermrc
set line /dev/ttyUSB0
set speed 19200
set carrier-watch off
set flow-control none
c
.kermrc file;
set modem type none
set line /dev/ttyS0
set carrier-watch off
set speed 19200
set flow-control none
set parity none
set stop-bits 1
connect
First you have to in install the usb-serial device (also the BMS can be connected directly to a serial port if any)
Read this page.
Later you have to install minicom
$ sudo apt-get install minicom
Then
$ sudo minicom -s
Note: 19200 for BMS Rev 1.xx, or 57600 for BMS Rev 2.xx
In config of the serial port:
    | A - Dispositivo Serial: /dev/ttyUSB0
    | B - Localizacion del Archivo de Bloqueo: /var/lock
    | C - Programa de Acceso:
    | D - Programa de Salida:
    | E - Bps/Paridad/Bits: 19200 8N1
    | F - Control de Flujo por Hardware: No
    | G - Control de Flujo por Software: No
This is in Spanish, but the order of the options is the same
Then you save the info as dft, and exit.
Then
$ sudo minicom
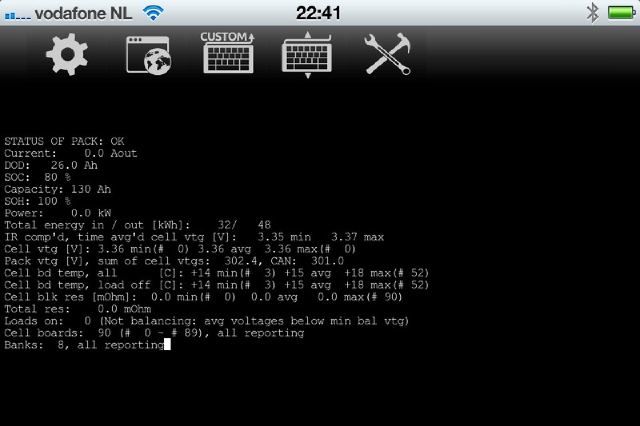
You can use an iPhone or iPad to monitor a Lithiumate Pro
- No laptop needed
- No jailbreaking required
- Ability to do remote access from any location via the Internet by settting up a web sharing session
Requirements:
Procedure:
- Wire the RJ45 to DE9 adapter
| RJ45 end
| Function
| Color
| DE9 end
|
| 4
| Gnd
| Red
| 5
|
| 6
| iPhone TXD -> BMS RXD
| Yellow
| 3
|
| 3
| BMS TXD -> iPhone RXD
| Black
| 2
|
- Set-up Get Console for:
| Rate
| 19200 (BMS Rev 1.xx) or 57600 (BMS Rev 2.xx)
|
| Flow control
| None
|
| Parity
| None
|
| Bits
| 8
|
| Stop bit
| 1
|
Thank you to Martijn Hendriks for this info.
*) Elithion is not associated with Get Console, is not resposnible for it, and makes no statements concerning its suitability to your application.
Requirements:
- Android device with USB port
- RS-232 / USB-Adapter
- Terminal application
Settings:
| Rate
| 19200 (BMS Rev 1.xx) or 57600 (BMS Rev 2.xx)
|
| Flow control
| None
|
| Parity
| None
|
| Bits
| 8
|
| Stop bit
| 1
|
In a PC computer, the terminal emulation application will ask you for the COM port.
For computers with a serial port, that is usually COM 1.
On the other side, if you're using a USB-RS232 adapter (dongle) the COM port will vary, and will depend on which USB socket you're using.
There are 2 ways to find out which COM port the dongle is using.
- Trial and error
- Try COM1. In that doesn't work, try COM2; etc.
- Look it up
- Click the "Start" icon on the bottom right; the Windows menu pops-up
- In the "Start Search" field at the bottom type "Device Manager"; "Device Manager" appears at the top of the list
- Click the "Device Manager" item; a dialog appears: "Windows needs your permission to continue"
- Click "Continue"; the "Device Manager" window appears
- In the list, find the "Ports (COM & LTP)" item
- Click on the '+' sign to the left of it; the item opens, showing the ports that are used
- Note the number of the COM port (if you later use a differ USB port, the COM number will change!)


Using the Device Manager to find the COM port used
Data captured from the serial terminal can be interpreted and plotted through an Excel file.
- Go to the "Status / As table" screen
- Start capturing data to a file
- Stop caturing data
- Open the capture file
- Copy the data from it
- Open this spreadsheet (.xls)
- Paste the data into it
- The spreadsheet will plot the data
Troubleshooting guide